How to create a realistic Bougainvillea with Ivy plugin
CGTricks brings you another very useful tutorial for 3ds Max users from Marco Mosetti.
This is a very simple tutorial on how to create a realistic Bougainvillea plant with Ivy plugin (but of course can be used to create any kind of plant and other rendering engines). There are many ways to create it, like using pflow or 3dsmax scatter, so this is just another way which I found the more convenient for me. To follow the tutorial you will need:
1) Guruware ivy plugin which you can download here
2) Vray (vrayproxies and vray2sided material)
IVY PLUGIN SETUP
I will not go to the process of installing the plugin and using it, you can find a very good documentation about it on the above link, but it is recommended that you play a little bit with it to understand the various settings in order to have an idea of how your plant will grow. For the bougainvillea I wanted to have a plant which is not too much attached to the object where it is growing and with some volume especially on the top. I used the following settings:
Grow-Parameters
Grow-Size: 7.0 cm
Up-Vector: 0.2
Primary Weight: 0.4
Random Weight: 0.2
Gravity: 1.2
Adhesion: 0.1
Adh. Distance: 10.0 cm
Branching: 0.3
Max Length: 300,0 cm
Length Variation: 2.0
max Parents: 4
Grow
Stop at: 2000
As a little tip if you are going to put your plant in some bigger project is better if you export the objects where the plant will grow and work on a different file, because the process itself requires quite a bit of memory. Then you will put them back as vray proxies.
MODELING THE BOUGAINVILLEA
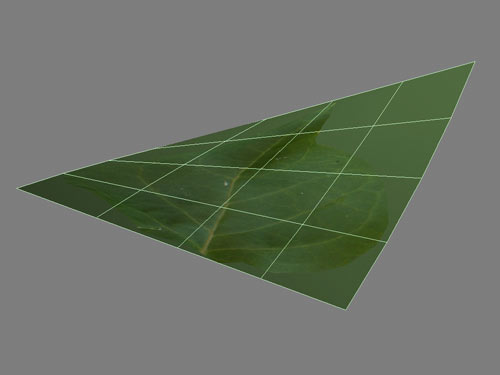
Once you have your setting ready just put the plant where you want it to grow and just let it grow until you are happy with the result. Now what I want to change is the flat look of the leaves (by default they are simple mapped planes). So first of all I create another variation of the leaves, from a simple plane 3×3 or 4×4 to which I will assign a bend and a twist modifier untill I have something like in the following picture:
Now I make two copies of my gwIvy object, one which I will use to add my custom leaves and one which I will use for the flowers later. So in total I will have 3 copies. On the original object I will leave the leaves from the plugin, with quite a high density (something like 0.7).
On my second copy first of all I will reduce the density of the leaves to 0.2 (IT IS VERY IMPORTANT!!! high values of density can make your computer VERY VERY SLOW! and you will not need too many of those leaves in the end). I will hide anything else and just leave the leaves of the young branch
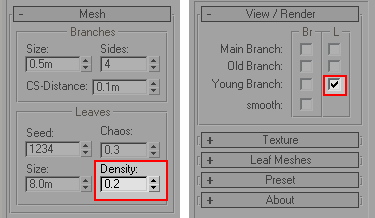
then I will select from the 1st slot of the leaf meshes the leaf that I just created and the plugin will use that as the leaves for your plant. One important thing is to change the Seed and the Chaos on the Leaves parameters to have some variations in the position of the leaves to avoid overlapping with the ones of the first object.
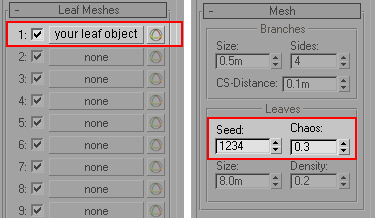
Once you are happy with the result you can convert the object to a polygon and then to a vrayproxy. I prefer to have 3 different vrayproxies for my final plant just to have some extra room for variation or in case it will be too heavy once I place it in the scene, but of course you can also create a final poly object and just one vrayproxy.
Now we will repeat the same process for the flowers. Firs of all I created a very simple flower object:
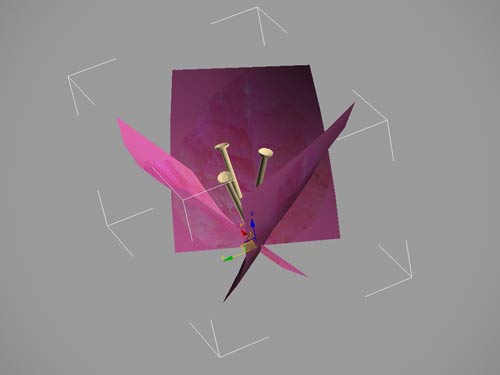
And again I chose this object in my Leaf Meshes slot, changing again Seed and Chaos and of course Density to 0.2. Once you are happy with your flower you can convert to polygon and create your vrayproxy. The same of course with the original gwIvy object.
RENDERING WITH VRAY
After each object is converted to polygon and before exporting it to vrayproxy I assign a vray2sided material to the leaves and to the flowers to give a little bit of translucency which add more realism to the plant (I use it almost on every plant/grass now).
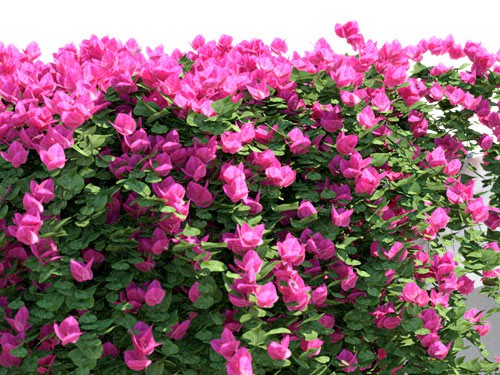
Now it is time to allign your two copies to the original one to have everything in place and ready for the render and here is my result:

Of course this is not really indicated for closeup shots, but still if you don’t get too close to the flowers you can have nice renders of your bougainvillea plant.
[junkie-button url=”http://www.mediafire.com/download/bbdvw7hlum4o388/bouganvillea.rar” style=”blue” size=”medium” type=”round” target=”_blank”] Get the Leaf and Petal textures [/junkie-button]


